Loon Phase Diffuser
Loon diffuses sound by rotating the STFT phase of each frequency bin by a fixed pseudo-random angle — widening the image, softening transients, and turning room sounds into textures, while leaving the tonal balance completely intact. This guide covers every control and four practical workflows.
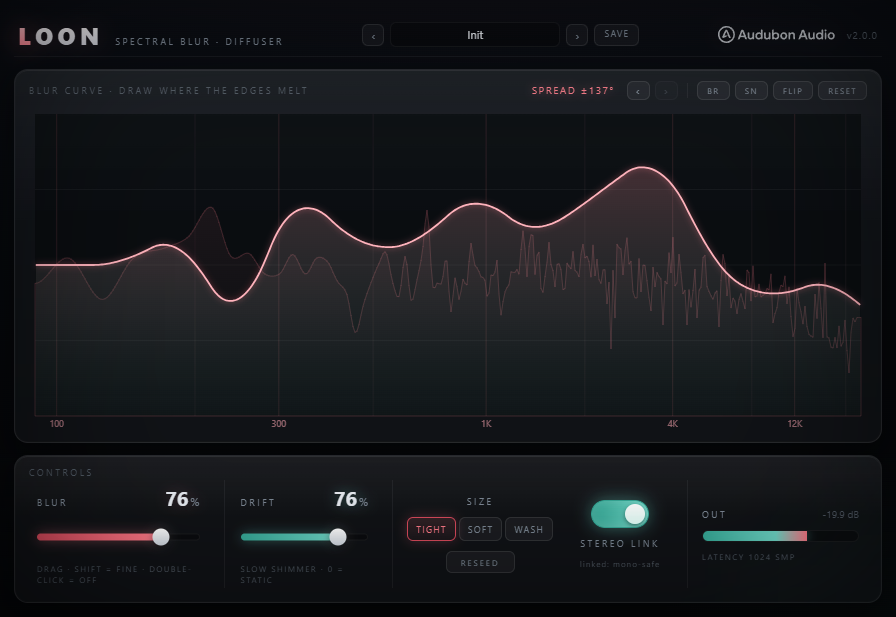
Blur — the main depth control
Blur is the global macro that scales every bin's rotation angle. At 0% the plugin is bit-transparent — the per-bin angles exist but are multiplied to zero, so nothing happens. As Blur rises, bins gain rotation according to the drawn curve weight at their frequency and the low-frequency protection ramp.
- 0–25% — Subtle. Barely perceptible in a full mix, useful as a glue or spatial widener on a bus. Safe on any source.
- 25–60% — Moderate. Transients soften noticeably. Reverb sends and room mics open up. Good starting range for pads and textures.
- 60–100% — Strong. The source blurs into a wide, diffuse wash. Best on sustained material — pads, strings, noise, synth textures — where this is the desired effect.
The sub-bass is always protected regardless of Blur level — a hard-coded ramp keeps bins below 120 Hz at zero rotation, reaching full depth by 350 Hz. No bass energy is lost at any Blur setting.
The Blur Curve — per-frequency depth
The 512-point drawable curve is a per-band multiplier for Blur. A flat line at 1.0 (default) means Blur applies uniformly everywhere above the bass ramp. Draw it lower in a band to protect that frequency from diffusion.
- Draw freehand — click and drag on the canvas. The X axis is frequency (log scale, matching the spectral analyser behind it). The Y axis is depth (0 = no diffusion, 1 = full Blur).
- Preset shapes — Flat / Rising / Falling / Mid Bell / High Hump / Rising Tiers. Access via the shape selector. Good starting points before customising.
- Brown randomizer — bounded random walk. Creates smooth spectral mountains and valleys. Good for organic, non-uniform diffusion.
- Smooth randomizer — interpolated with soft-clip shaping. Softer than Brown, no harsh curves.
- Flip — mirrors the curve vertically (1−y). A rising curve becomes falling, a high hump becomes a valley.
- Reset — restore flat 1.0 default.
- Undo/Redo — 5-step history. All tool actions and drawn changes are captured. Standard keyboard shortcuts if the plugin has focus.
Stereo Link & decorrelation
The Stereo Link toggle controls whether the L and R channels share one set of per-bin phase angles or get independent sets.
- Link On (default) — Both channels rotate by the same angles. The diffusion is mono-compatible: summing L+R produces the same energy as the input. Good for master bus, reverb sends, or anywhere mono compatibility matters.
- Link Off — Each channel draws its angles from an independent seed. The two channels rotate completely differently across every bin, creating a wide stereo image that sounds enormous on headphones. Check mono compatibility — some partial cancellation is expected and is by design. Safe for headphone-optimised content and background layers.
The sub-bass protection ramp applies to both channels independently in all Link modes — bass diffusion is always prevented.
Drift — organic shimmer
At 0% the phase angles are perfectly static — the exact same rotation every block, no movement, no warble. Drift adds a very slow per-bin random walk: each angle wanders within a bounded range (±π), sized so it takes about 8 seconds to traverse its full range.
- 0% — Completely static. Byte-identical to no-drift processing. Use when you want a fixed, predictable spatial character.
- 10–30% — Subtle shimmer. On long pads and room sounds, the diffusion character evolves slowly — the sound seems to breathe. Not perceptible as motion, just as life.
- 40–70% — Audible movement. The spatial character changes over time like a slowly rotating room. Good on sustained textures and drone layers.
- 70–100% — Faster walk. More obvious motion. Starts to resemble a very slow chorus or flanger. Best on deliberately evolving texture material.
When Link is on, R replays L's walk (same drift path, same mono sum). When Link is off, each channel walks independently — the stereo image evolves differently on each side, which is even wider.
Size & latency
Size sets the FFT window length. Larger windows resolve lower frequencies more distinctly and produce a longer, more enveloping wash — but at the cost of more latency. The host compensates automatically via PDC (plug-in delay compensation).
- Tight (1024 samples) — ≈23 ms at 44.1 kHz. Lowest latency. Good for live or low-latency studio use. Slightly less resolution in the sub-bass, but the bass ramp protects that area anyway.
- Soft (2048 samples) — ≈46 ms. Default sweet spot for most studio sessions. The phase rotation is more distinct across a wider bin range.
- Wash (4096 samples) — ≈93 ms. Maximum smearing. Long diffusion tails. Best for ambient, drone, or film work where transient softening is the explicit goal and latency is acceptable.
Size is not automatable — switching it re-prepares the engine off the audio thread and re-reports latency to the host. Set it before the session rather than mid-playback.
Reseed
The Reseed button draws a completely new set of pseudo-random per-bin angles from fresh seeds. Everything else stays the same — the curve, Amount, Drift, Size — only the fingerprint of which bin gets which angle changes.
Use Reseed when: a partial in your source material happens to land near a phase relationship that causes an unwanted resonance or hollow quality. Reseed moves every bin to a new angle, typically resolving the artefact in one or two tries. The new seeds are saved with the preset, so your chosen fingerprint restores on load.
Reverb send diffuser
Insert Loon on your reverb return channel. Use a Rising or High Hump curve so diffusion is focused in the mid-top. Set Blur to 50–70%, Stereo Link on, Drift 20–30%. The reverb tails become more spatially diffuse and evolving without changing their decay time or tone. Feed multiple tracks through the same send — each source benefits from the same diffusion fingerprint, which glues the reverb into one coherent space.
Headphone stereo widener
Insert on a stereo bus or a background layer. Turn Stereo Link off. Set Blur to 60–80%, flat curve, Drift 0%. The L and R channels rotate by completely independent angles — the stereo image stretches very wide and sounds enormous on headphones. Check mono: sum L+R and compare energy. Some reduction at high Blur is expected; lower Blur until mono level is acceptable. Save a Reseed that gives a good result.
Pad shimmer layer
Insert on a sustained synth pad. Set Blur 80–100%, Wash or Soft size, Drift 25–50%, Link on. The pad becomes an evolving, spatially diffuse wash that shifts slowly over time. Combine with a slight Drift so no two bars sound identical. The sub frequencies pass clean — bass movement from the pad stays anchored. Add a Falling curve to focus diffusion in the lows-to-mids and keep the high harmonics crisp.
Subtle mix glue
Insert on the master bus or a parallel bus. Set Blur to 15–25%, flat curve, Link on, Drift 0%. At this depth, Loon adds barely perceptible inter-channel diffusion — a slight sense of depth and air without any obvious effect. It's the equivalent of a very gentle tape-machine phase randomisation. Use Mix automation to blend between 0% and 25% for transitions, or leave it static at 15–20% throughout. The tone is guaranteed unchanged — only phase, never magnitude.