Grosbeak Master Clipper
Grosbeak makes a bus fat, adds top-end colour, and finishes through a GClip-style ceiling you can see — all zero-latency in the default path, so it's safe as the last plugin on a live master. This guide covers every control and four practical workflows.
FAT, COLOR and a GClip-style ceiling you can see. Drive the clipper, shape the knee, and use DELTA to hear exactly what it's doing. · Watch on YouTube ↗
Input & the signal path
Input trims level into the whole chain (−18 to +18 dB, default 0). Because FAT and COLOR are level-dependent shapers, Input sets how hard you drive them. The dry tap used by Mix is taken right after this trim, so a parallel blend always stays level-balanced.
The order is fixed and simple: Input → FAT → COLOR → Mix (against the dry) → Output → Clip. At rest — FAT 0%, COLOR 0%, Clip at 0 dB — the whole thing passes the signal bit-transparent and adds zero latency.
- Set Input first — get the meters reading healthy before you shape anything.
- Positive Input pushes harder into FAT/COLOR; trim Output later to bring the level back if needed.
Fat — the fattener
Fat (0–100%, default 0) is a biased-tanh saturator that morphs from clean into loudness-matched 2nd/3rd-order harmonic warmth. Its makeup gain is measured from the AC-RMS of the shaping curve, so turning it up adds harmonic density, not level — loudness holds within ±1.3 dB across the whole sweep.
- 0–15% — Barely-there weight. Glue for a bus, adds subtle body without a recognisable "distortion" character.
- 15–40% — Clear thickness. The programme feels denser and more finished. The everyday master/bus range.
- 40–70% — Obvious fatness. Strong harmonic colour — best on drums, synths, or a drop bus where heaviness is the point.
- 70–100% — A deliberate slam. Heavy saturation; consider HQ 4× (Step 6) if aliasing becomes audible.
At maximum, the 2nd harmonic sits around −19.7 dB. A DC blocker after FAT removes the DC component the even-harmonic bias produces, so nothing offsets your low end.
Sub Safe — protect the low end
Sub Safe (on/off, default off) inserts a Linkwitz-Riley 4th-order crossover at 110 Hz and routes everything below it around the saturator. The sub stays clean no matter how hard you push FAT; the dry stays phase-matched via the LR4 allpass reconstruction.
- Off (default) — the original full-band Condor-master sound. The subs saturate along with everything else; good for aggressive, all-in fatness.
- On — the low end skips FAT entirely. The 2nd harmonic of a 43 Hz sub drops from −34 dB to −112 dB at full FAT. Turn this on the moment heavy FAT starts to smear or weaken the bass.
Color — air & presence
Color (0–100%, default 0) is two moves in one knob: an RBJ 2nd-order high shelf at 4.8 kHz (about +4.6 dB at 15 kHz maxed) and an envelope-normalised air exciter on the band above 8 kHz. Because the exciter is normalised to the signal envelope, you get the same sheen at −24 dBFS as at −6 dBFS — no pumping, no level-dependence.
- 5–15% — Subtle sweetening. Opens the top end slightly, adds a sense of air.
- 30–45% — An obvious lift. Brings a dull or dark mix forward and adds sparkle above 8 kHz.
- 50%+ — Bright and excited. Watch the highs on already-airy material.
The shelf is calibrated to lift the high air with 1.6 dB less push at 2.5 kHz than a naive one-pole — so you get top without the upper-mid forwardness.
Mix & Output
Mix (0–100%, default 100) blends the processed wet chain against the phase-matched dry. Output (−18 to +18 dB, default 0) sets the level going into the clip section.
- Mix 100% — a straight in-line master fattener. The whole signal is processed.
- Mix 40–60% — parallel processing. Dense harmonics sit under an intact dry signal, so you keep the transient snap. The dry is latency-free and sample-aligned, so this never comb-filters.
- Output — use it to set how hard the fattened, coloured signal hits the clip ceiling before the GAIN stage drives it further.
The Clip section — Gain, Clip, Soft
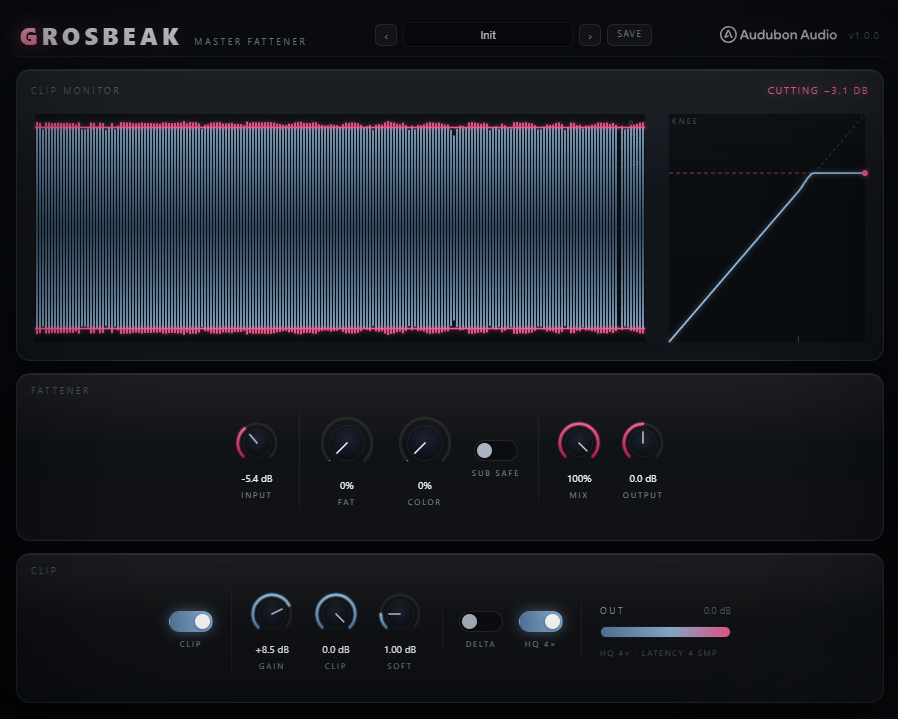
The finisher is a GClip-style ceiling with three controls, drawn live in the Clip Monitor. The Clip on/off pill enables the whole section (default on); off is an honest bypass for null tests.
- Gain (−18 to +18 dB, default 0) — drive into the ceiling. The loudness lever: more GAIN pushes more of the programme into the knee and past the ceiling.
- Clip (−18 to 0 dB, default 0) — the ceiling itself. Everything above it is clipped. Shown as the raspberry line in the monitor.
- Soft (0 to 6 dB, default 1.0) — the knee width below the ceiling. 0 = a pure hard clip; 1 dB reproduces the Condor GClip exactly; higher values give a rounder, softer approach.
Watch the monitor: the frost wave is your clipper output, glowing raspberry slices are what got cut, and the faint dashed line is where the SOFT knee starts to bend. The live readout tells you "CLEAN", "CUTTING −1.2 dB", or "CLIP OFF". Aim for occasional cuts on peaks unless a slam is the goal.
HQ 4× & Delta
HQ 4× (on/off, default off) oversamples the entire nonlinear chain. Off is the bit-identical, zero-latency path. On drops the worst-case alias floor from −34 dB to −71 dB with 0.00 dB of character change, and reports the oversampler's few samples of latency to the host — so toggle it while playback is stopped for a clean switch. Reach for it only when you're pushing extreme FAT or clip settings and hear aliasing.
Delta (on/off, default off) plays output minus the gain-matched dry: exactly what FAT and COLOR add and what the clipper removes. If it nulls to silence, the chain is currently linear and you're bit-transparent. The pill is accent-lit so an armed Delta can't be left on unnoticed — the clip monitor keeps showing the normal picture while you listen.
Presets
The preset bar carries nine factory presets. Applying any preset resets every parameter to its default first, then dials in only the listed values — so each is a clean, predictable starting point (HQ and Delta always stay at their defaults).
- Init — all defaults, bit-transparent.
- Bus Glue — Fat 15%, Color 8%. Light glue for a stereo bus.
- Fat & Loud — Fat 32%, Color 18%, Gain +3 dB. Forward and thick.
- Drop Slam — Fat 45%, Color 25%, Gain +6 dB, Soft 0.5 dB. Maximum weight.
- Warm Master — Fat 24%, Soft 3 dB, Mix 85%. A rounded, gentle finish.
- Sub Safe Slam — Sub Safe on, Fat 55%, Gain +5 dB. Slam the mids/highs, keep the sub clean.
- Air Lift — Fat 6%, Color 42%. Mostly presence and air.
- Just Clip — Gain +4 dB, Soft 0.2 dB. Transparent clip-only ceiling.
- Parallel Thick — Fat 62%, Mix 45%. Parallel saturation under the dry.
Save your own with the SAVE button; user presets are stored under Documents → Audubon Audio → Grosbeak → Presets and appear in the preset menu below the factory list.
Master-bus glue
Insert Grosbeak last on the master. Start from Bus Glue, or dial Fat to 15–25% and Color to 5–10% by hand. Leave Mix at 100%, Clip on at 0 dB with SOFT around 1 dB. The mix pulls together and gains subtle top-end air, while the clip section only touches the odd peak over 0 dB. Watch the monitor for occasional raspberry slices, not constant cutting. Zero latency, so it's safe on a live session.
Drop slam
On a drop or full-mix bus, load Drop Slam or push Fat to 45–60% and Color to 20–25%. Turn on Sub Safe so the sub-bass survives the saturation. Set the ceiling with Clip, then drive GAIN to +5 to +8 dB into a tight knee (SOFT 0.2–0.5). You'll see heavy, steady clipping in the monitor — that's the intent. If the aliasing gets fizzy at these settings, stop playback and enable HQ 4×.
Parallel thickening
On a drum or synth bus where you need body but must keep the attack, load Parallel Thick or set Fat to 55–65% and pull Mix down to 40–50%. The dry tap is phase-matched and latency-free, so the dense saturated harmonics sit under the intact dry with no comb filtering. Add a little Color for air. Use DELTA to hear exactly what the saturation is adding before you commit the blend.
Clip-only finish
When you only want loudness control with no colour, load Just Clip or leave Fat and Color at 0%. Set the ceiling with Clip, add +3 to +5 dB of GAIN, and choose a tight knee (SOFT 0.2) for a transparent hard clip or a wider one (SOFT 2–4) for a softer landing. The Clip Monitor and KNEE inset show exactly where the programme meets the ceiling. Flip DELTA to confirm you're only removing peaks, adding nothing.