What Raven does: Raven runs a weighted overlap-add STFT and applies an independent compressor to every frequency bin — 512 of them at the default 1024-point FFT. Each bin has its own attack/release envelope follower and a gain calculation that pushes it toward a per-bin target level. Bins above target are attenuated (downward); bins below target are lifted (upward). The target itself is a shaped spectral curve (Flat, Sloped, or OTT) tilted by a ±6 dB/oct control. The result is spectral reshaping: you're adjusting the frequency balance of the signal, not applying a single broadband threshold.
Interface Overview
1
Spectrum Analyser & GR Meter
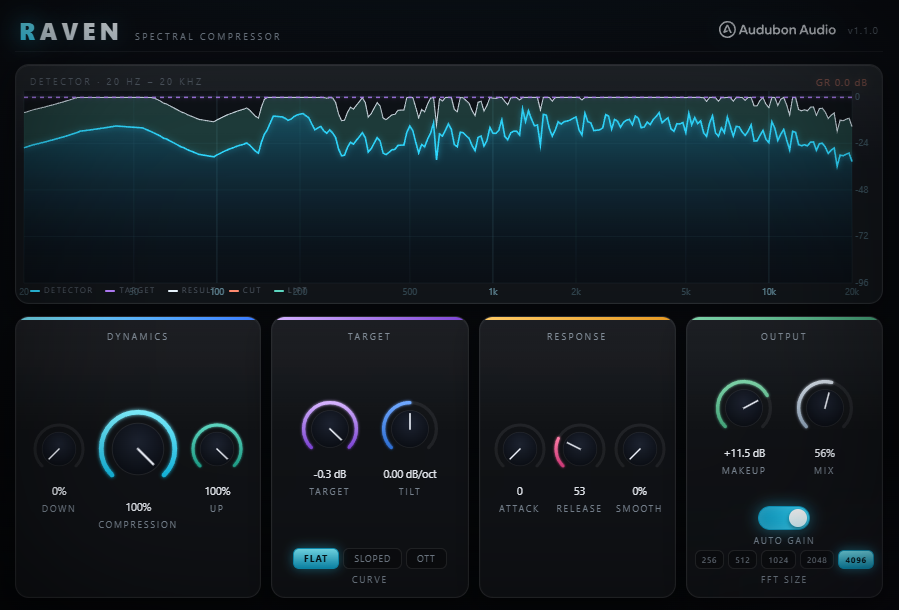
The main display shows the per-bin detector level (left channel) as a spectrum. A separate GR meter shows the detector-weighted downward gain reduction — it tracks cuts only, so upward lift never reads as compression.
Spectrum
Live display
Per-bin detector magnitude in dB, updated every STFT frame (~23 ms at default 1024 FFT). Shows what the compressor sees, not the output.
GR Meter
Downward only
Detector-weighted net downward reduction in dB. Upward lift is excluded so the meter reads compression depth, not the up/down balance.
2
Target Curve
The target curve sets the per-bin threshold — the spectral shape the compressor pushes the signal toward. Choose the base shape, then offset the whole curve with Target and rotate it with Tilt.
Curve
Flat / Sloped / OTT
Flat = uniform threshold at Target dB. Sloped = natural bass-weighted curve (heavier in lows). OTT = over-the-top style (steep in highs, lifted in lows). Default: Sloped.
Target
−64 to 0 dB
Overall threshold level offset. Move down to engage more bins in downward compression; move up to engage more bins in upward lift. Default −30 dB.
Tilt
−6 to +6 dB/oct
Rotates the curve around 1 kHz. Positive = target is raised in the highs (more HF compression pressure). Negative = raised in the lows. Default 0.
3
Upward & Downward Ratio
Two independent dials that control how aggressively each direction compresses toward the target. Both are scaled by the Compression master depth macro.
Compression
0 – 100%
Master depth macro. Scales both Upward and Downward amounts in the DSP — does not write back to the ratio dials. Pull to 0 for bypass. Default 100%.
Upward Ratio
0.00 – 1.00
How far bins below target are lifted. 0 = upward off; 0.5 ≈ 2:1 lift; 1.0 = flatten to target. Scaled by Compression. Default 0.50.
Downward Ratio
0.00 – 1.00
How far bins above target are attenuated. 0 = downward off; 0.5 ≈ 2:1 cut; 1.0 = flatten to target. Scaled by Compression. Default 0.50.
4
Attack, Release & Smoothing
Controls for the per-bin envelope ballistics and cross-bin spectral smoothing.
Attack
0 – 200 (0–280 ms)
Per-bin envelope attack time. 0 = instantaneous (spectral clipper mode). Default 40 ≈ 10 ms — lets note attacks pass before the envelope catches up.
Release
0 – 200 (0–1 s)
Per-bin envelope release time. Longer values keep compression in place between notes. Default 90 ≈ 60 ms.
Smoothing
0 – 100%
Bidirectional cross-bin low-pass on the detector. 0% = fully per-bin (surgical); 100% = neighbouring bins pull each other (multiband-like). Default 25%.
5
Makeup, Mix & Auto Gain
Output level and blend controls.
Makeup
−6 to +18 dB
Wet-path gain applied before the Mix blend. Compensates for net level change from the up/down balance. Default 0 dB.
Mix
0 – 100%
Dry/wet blend. 100% = full spectral compression. Pull back for parallel compression — the dry signal keeps transients intact. Default 100%.
Auto Gain
On / Off
When On, slews a compensating gain (~1.5 s) to cancel the net wet-level delta from up/down imbalance. Audition spectral shape changes at matched loudness. Default On.
6
FFT Size
Sets frequency resolution and plugin latency together. The host compensates automatically via PDC.
256
128 bands / ≈6 ms
Fastest response, coarsest frequency separation. Good when latency matters more than precision.
512
256 bands / ≈12 ms
Light work with better bin count. Solid choice for live monitoring or tight-latency chains.
1024 (default)
512 bands / ≈23 ms
Best all-round choice. Host compensates latency automatically.
2048 / 4096
1024–2048 bands / ≈46–93 ms
Maximum frequency resolution. Useful on a full mix bus or when targeting narrow resonances. PDC reported to host.
Typical Workflow
A
Set the Curve and Target First
Choose Sloped as a starting point (it matches the natural balance of most bass content). Set Target so the spectrum display shows most of your signal sitting near the target line — typically −24 to −18 dB for a full bass. Watch the GR meter: if it reads nothing, the signal isn't reaching the target; raise Target until it engages.
B
Isolate One Direction at a Time
Set Upward Ratio to 0 and work with Downward only first. This is the familiar compressor direction — taming peaks, reducing resonances, evening out loud harmonics. Then set Downward to 0 and try Upward alone: you'll hear quiet frequency bands get lifted, adding body and presence. Once you hear what each does in isolation, combine them.
C
Shape the Feel with Attack & Smoothing
For tight modern bass: keep Attack at 0–20. For organic wobble: try 60–100 to let note attacks bloom through. Raise Smoothing to 30–50% if the result sounds too artificial or processed — it makes adjacent bins behave together, which reduces artefacts on harmonic content. Use Tilt to bias the pressure toward lows or highs without switching curves.
D
Trim Output and Blend
Leave Auto Gain on while dialling in ratios — it keeps the level stable so you're hearing the spectral shape change, not a volume shift. Once you're happy with the character, disable Auto Gain and use Makeup to set the final wet level, then blend with Mix if you want dry transients in the output.